July 31, 2015

JULY BEAUTY FAVOURITES


Since it's the last day of July today, I thought I would post about the products that I have been loving this month. Most of these are old products that I started using again, one is a product that I have been loving for months, and another is a product that I only got last month, but have been using every single day! I didn't buy any beauty products this month, as I was saving money to spend in Sephora when I went to America a few days ago, which I will be telling you about once I have tried and tested them for a few weeks, so check back for posts about them in August!

My first favourite this month is my NARS Sheer Glow Foundation in the shade 'Siberia'. Although I've had this for about seven months now, I stopped using it for a few months when I got my Charlotte Tilbury Light Wonder Foundation, which has a lighter, more dewy coverage, which I tend to prefer in the spring and summer months. However, as my skin broke out a bit due to exam stress, I went back to this foundation as I wanted more coverage, but still with a natural finish. I have to say, this foundation is amazing and I have been using it constantly for the past few weeks, as it has quite good coverage, but it still looks extremely natural on the skin, and it is not cakey at all. Look out for a full review on this foundation in the coming month!

My second favourite this month is another NARS product, the NARS 'Deep Throat' Blush. Like the foundation, I have had this blush for quite a long time, but I stopped using it when I got my Charlotte Tilbury Cheek to Chic Blush in 'First Love'. When I went on holiday, I brought this blush with me, and I fell in love with it again. It gives a lovely, natural peachy-pink glow to your cheeks, without being overly shimmery or glittery.

My third favourite this month is my Chanel Rouge Coco Shine Lipstick in 'Boy'. This is a very sheer, 'my lips but better' pinky shade that feels like a lip balm on the lips. It is very moisturising, but it also has a nice amount of colour in it. I have been using this lipstick nearly every day since I got it for Christmas, although I did get a new one last week as my mum took my old one to use for a few months when she ran out of hers, and she bought me a new one last week. Although this lipstick does seem quite pricey, especially as it is so sheer, it is the best lipstick I have ever tried, and I like that it is sheer because it means that I can wear it all the time.

My fourth beauty favourite this month is my Charlotte Tilbury Brow Lift in 'Cara D'. I got this product last month when my mum treated me to a few products after my exams. Before using this, I used my Anastasia Beverly Hills Brow Wiz every day, which I liked, but even though I have quite thick brows, I do need to fill in some gaps and even them out, and I found that the tiny nib took ages to fill in my brows properly. I much prefer this Charlotte Tilbury eyebrow pencil, as the shades are very cool and this particular shade, Cara D, matches my eyebrows perfectly. The spoolie on the end of it is also the best one I have ever tried, and it is great at brushing up the brow hairs to make your eyebrows look fuller! There is also a highlighter for under the brow bone in this pencil, but I do not use it because it is a bit too dark and shimmery for my skin tone. This eyebrow pencil reminds me of the Hourglass Eyebrow Pencil, which my mum loves and uses, but I prefer the shade of the Charlotte Tilbury pencil, as it isn't as warm.

My last favourite this month is another Charlotte Tilbury product, the Charlotte Tilbury Feline Flick Black Liquid Eyeliner. I bought this for myself back in November when I wanted to learn how to use liquid eyeliner, as I was the worst person in the world at using it, and I found that while it made using liquid eyeliner much easier than before, I still couldn't get the hang of it. I decided to try and use it again about a month ago, and I was so surprised at how easy it is to get a perfect straight line using this pen! Using the side of it, I press the liquid into my lashline, and I do this from the inner to outer corners of my eyes. This pen is so easy to use, and the nib of the pen is stiff, so it doesn't move. The product is also great, it lasts on my eyelids for about 10-12 hours. It isn't exactly waterproof, but the eyeliner doesn't smudge at all, and it is very hard to get off at the end of the day with eye makeup remover. This is the best liquid eyeliner I have ever tried, although I do want to try the Tom Ford Eye Defining Liquid Eyeliner Pen next, but as it is a lot more expensive, I don't think I will!

These were all of my favourite products that I have been using over the past month. They are all amazing products that I know I will be using in the future also.

July 30, 2015

FOLLOW ME ON TWITTER

This is just a quick post to let everyone know that I am now on Twitter! You can follow me by clicking the 'Follow' button in the sidebar, or alternatively by searching @lauraalucie. I am only new to it, so please bear with me!

Thanks,

Laura

July 29, 2015

HOW TO MAKE YOUR MAKEUP LAST ALL DAY


When you have school or work all day, it can be hard to find the time to re-apply your makeup multiple times a day. As I wear tinted moisturiser and concealer to school most days, when I put them on in the morning I need to ensure that they will last the entire school day with no touching up. Here are some tips to help your makeup to last all day:


Moisturise
Before starting your makeup routine, make sure your skin is moisturised, as if your skin has moisture the makeup will go on smoothly, and it will also stay on the skin longer, as your skin will not be trying to take all the moisture out of it. Use your usual day moisturiser all over your face to ensure that your base will last. I would also recommend using a thick eye cream every night, as if your under-eye area is moisturised your concealer will not crease. I use the Kiehl's Creamy Eye Treatment with Avocado (not shown in picture). You should also put a good, thick lip balm on before starting your makeup, as it will have sunk in to your lips by the time you are ready to put your lip products on, and it will help them to stay your lips for as long as possible throughout the day. The NUXE Reve de Miel Lip Balm is great, as it is very thick and moisturising, but it sinks in quickly and it is not shiny or sticky on the lips.

Prime
After moisturising, you should use a primer on your skin just before applying your base. This will help your base stay on for as long as possible throughout the day, and it also helps to prevent your makeup from going patchy or shiny. The primer I use is the Charlotte Tilbury Wonderglow Primer. It gives a subtle glow to the skin, and it also helps to prevent shine on the skin later on in the day. As I have very dry skin, I like to use this primer as it gives my skin a natural glow without looking oily, but if you have very oily skin you might prefer a mattifying primer.

If you are going to be wearing eyeshadow or eyeliner on the eyelid, I would also advise to use an eyeshadow primer before applying your eye makeup, as it will help the eye makeup to stay on as long as possible, and it will prevent your eyeshadow from creasing or disappearing on the eyelids throughout the day. The best eyeshadow primer I have ever tried is the NARS Smudge Proof Eyeshadow Base, and I use this whenever I am wearing eyeshadow because this is the only primer that can stop the eyeshadow from creasing and disappearing on my very oily eyelids. When I don't use this primer, eyeshadow only lasts about 2-3 hours on my eyelids, but with it, eyeshadow will last up to 12 hours!

Use Brushes
I find that whenever I use brushes to apply my base and concealer, they last longer on my skin. This is probably because when I use a buffing brush for my foundation, such as my Bobbi Brown Full Coverage Face Brush, by using circular motions to apply and blend the foundation, it really buffs the foundation into my skin, making the foundation look more natural on my skin and making it last longer. I also find that when applying concealer with a brush, such as a MAC 217 Brush (not shown), concealer lasts longer on my skin, as it is buffing it into the skin.

Powder
The final step I always do when I want my makeup to last as long as possible is powdering. First, I set my concealer with powder, to ensure that it doesn't move throughout the day or crease under my eyes. To do this, I use my NARS Light Reflecting Pressed Setting Powder and my Real Techniques Contour Brush (Sold in the Core Collection Set). I find that when I powder my concealer using a smaller brush, it doesn't move or fade throughout the day, which means I don't need to touch it up. To powder my T Zone and the rest of my face to ensure the rest of my makeup doesn't move and to ensure that my skin doesn't get too shiny throughout the day, I use my NARS powder again, but this time with a Real Techniques Powder Brush.


I find that when I use all of these tips, my makeup lasts much longer than it usually would, and I can go for an entire school day of about 8 hours without even needing to think about touching up my makeup at all throughout the day.

July 26, 2015

TOO FACED NATURAL EYES PALETTE REVIEW


Top Row, from left to right: Heaven, Cashmere Bunny, Sexpresso
Middle Row, from left to right: Silk Teddy, Push-Up, Erotica
Bottom Row: Nudie, Honey Pot, Chocolate Martini
The Too Faced Natural Eyes Palette is one of my favourite eyeshadow palettes. It is the perfect size for travelling, and it has a nice range of both matte and shimmer shades. The eyeshadows are also very pigmented, and I find them very easy to blend. They stay on my lids for about 8-10 without creasing when I use my NARS Smudge Proof Eyeshadow Base underneath.

This palette has nine eyeshadows in it, and the eyeshadows are divided into three different looks; Day, Classic, and Fashion. There are three eyeshadows in each look, which gives you a lid shade, a crease shade, and an outer corner shade that I also use to deepen the crease sometimes. The fact that this palette is divided into three different looks makes it ideal for travelling, as you have three completely different eyeshadow looks for all occasions. You can also, obviously, mix and match the looks to suit you.

The Day look has three matte shades in it, which makes this look perfect for work and school. The base shade, 'Heaven', is a very pale ivory colour. It is a great base colour, especially for those with paler skin. The next shade, 'Cashmere Bunny' is a light brown-taupe colour, which is perfect as a crease colour. 'Sexspresso' is a dark brown colour that is great for deepening the crease and using in the outer corner of the eye. All of these shadows are very buttery and pigmented, and they also blend very well into the skin. Even though this look might be the most boring in the palette, it is the look that I have worn the most.

The Classic look has three quite shimmery shades in it. After the Day look, this is the look that I find myself wearing the most. I even often wear the shadows in this look on my eyelids, with the shadows in the Day look in my crease or outer corner. The base shade in this palette, 'Silk Teddy', is a shimmery pale champagne pink shade. The next shade, 'Push-Up' is a pinky-bronzey shade. I love wearing this shade in the crease with 'Silk Teddy' on my lids, as I find that these two shadows together make my green eyes pop. The final shade in this look, 'Erotica' is a dark brown shade with gold glitter. I don't find myself using this shade very often, as sometimes the gold glitter particles tend to cause fallout. Apart from 'Erotica', I love this look because the shadows are extremely pigmented and there is no fallout at all. These shadows are also extremely easy to blend.

The Fashion look has two shimmery shades and one matte shade. I find myself wearing the eyeshadows in this look very rarely, as because my skin is so pale, the gold shade, 'Honey Pot', doesn't really suit me, and neither does the 'Chocolate Martini' shade. The base shade in this look, 'Nudie', is a matte beige shade that is a great natural crease shade on very pale skin, such as mine. On most skin tones though, it is a great, natural looking base shade to put all over the lid. The next shade, 'Honey Pot' is a shimmery warm gold shade. The last shade in this look, 'Chocolate Martini', is a warm chocolate brown shade with gold glitter. Even though 'Honey Pot' and 'Chocolate Martini' don't really suit my skin tone, they are beautiful eyeshadows, and they are very pigmented and buttery. 

This palette is great because it has a mix of both shimmery and matte shadows, and because this palette is divided into three different looks for all occasions, this would be a great eyeshadow palette for beginners, as it also comes with a booklet describing how and where to apply the eyeshadows for each look. This is also a great addition to any makeup addict's collection, as even though the shades in this are quite alike to the ones in many other eyeshadow palettes, specifically the Urban Decay 'Naked' range, the eyeshadows in this palette are amazing quality and as I said already, this is the perfect palette for travelling as it is compact, and it has a great mix of eyeshadows. I would recommend this palette to beginners and makeup lovers alike.

July 24, 2015

URBAN DECAY NAKED 2 PALETTE REVIEW


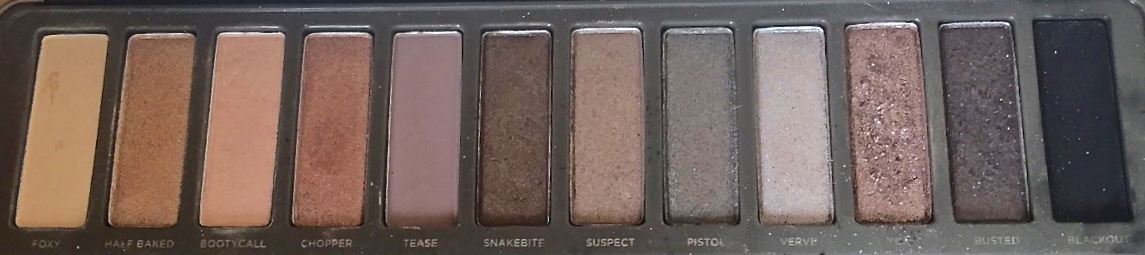
From left to right: Foxy, Half Baked, Bootycall, Chopper, Tease, Snakebite
From left to right: Suspect, Pistol, Verve, YDK, Busted, Blackout
After having posted my Naked 1 Palette Review, I thought I would continue on and review the second addition to the Urban Decay Naked Palette range, the Naked 2 Palette. This is definitely the Naked palette that I use the least, as I find that the mix of taupe and greige eyeshadows in this palette just don't suit my pale skin tone. Also, I find that the eyeshadows in this palette are very sparkly, whereas in the original Naked palette the eyeshadows have more of a shimmer, which I prefer. Although the eyeshadows in this palette don't really suit my pale skin, I have seen people with slightly darker skin tones wearing eyeshadows from this palette and the colours really suit them.

Just like the Naked 1, there are 12 eyeshadows in this palette. Unlike the Naked 1 palette, which has eyeshadows that can also be used for a natural, daytime eye look,  I would say that this palette is smokier and more suited to being used for a smokey eye. The eyeshadows in this palette are mostly shimmery or metallic, as there are only three matte eyeshadows in this palette; 'Foxy', a matte yellow-toned ivory shade, 'Tease', a matte taupe-brown shade, and 'Blackout', a matte black shade. The eyeshadows in this palette are extremely pigmented, and even with the most glittery shades, such as 'Chopper' and 'YDK', there is never any fallout. I can't say how long these would last on the eyes without a primer, but on top of my NARS Smudge Proof Eyeshadow Base, they will last about 10 hours on my very oily eyelids with no creasing.

As well as with the original Naked palette, one of the best things about this palette is how versatile it is. There is a great mix of taupe, gold, bronze, brown and greige shades in this palette, which means that there is a multitude of different eyeshadow looks possible using this palette alone. This makes this palette ideal for travelling, as if you find yourself wearing these kinds of colours often, you can just bring this palette with you and then you don't need to bring any other eyeshadows, as there are a variety of lid, crease, outer corner, highlight and even liner shades all in one palette. A double-ended brush also comes with this palette, with a blending brush and a shadow brush on either end, but it isn't very good, and I would advise to just use your own eyeshadow brushes instead. This palette also has a huge mirror inside. The Naked 2 Palette has also improved upon the original palette's packaging, as instead of the felt covering and the soft magnetic closure of the original palette, this palette is housed in a tin with a snap lock. This makes the Naked 2 Palette perfect for travelling, as it could not open itself in your luggage and spill everywhere as the first one sometimes can.

Even though I don't reach for this palette very often, there are a few eyeshadows in this that I enjoy using, and my favourite eyeshadow look using this palette is putting the shade 'Chopper' all over my lid, and then popping 'Tease' in my crease and blending it out. If I want to make this look a bit more smoky, I will pop the 'Busted' shade in my outer corner and blend it into the crease a bit to deepen it. This creates an amazing copper-toned brown smokey eye that looks lovely with my green eyes.

I would recommend this palette to people of all ages who like shimmery eyeshadow, and I would recommend this palette to all skin tones, unless if you are very pale like me ('Siberia' in NARS Sheer Glow), maybe swatch the eyeshadows or try some on in store before purchasing it. This palette is perfect for both beginners and people who love makeup, as the shade range is amazing, and the eyeshadows are fantastic quality.

July 22, 2015

MY MAC EYESHADOW COLLECTION

Top Row, from left to right: Blanc Type, Naked Lunch, All That Glitters, Sable
Bottom Row, from left to right; Omega, Satin Taupe, Woodwinked, Quarry

Top Row, from left to right: Blanc Type, Naked Lunch
Bottom Row, from left to right: Omega, Satin Taupe

Top Row, from left to right: All That Glitters, Sable
Bottom Row, from left to right: Woodwinked, Quarry

After I posted about last week, I decided that it was time that I posted about my MAC Eyeshadow collection too. Last summer, I went through a phase of collecting MAC eyeshadows, and I was determined to fill up my palette by the end of the year. As you can see, that hasn't happened, but I do hope to fill it up soon, as there are a lot of MAC eyeshadows that I really want! MAC eyeshadows are some of my favourite eyeshadows, because there is such a wide range of shades, and they are always extremely buttery and pigmented.

I buy the MAC Eyeshadow Pro Palette Refill Pans, and I keep them in my MAC Large Pro Palette with the 15 Pro Palette Eyeshadow insert. I did this because I figured that it would be easier to store MAC eyeshadows in one big palette rather than keeping them separately, and it would be easier to bring my MAC eyeshadows with me when travelling. Also, if you buy the MAC Eyeshadow Pro Palette Refill Pans, they are €6.50 cheaper each than the regular MAC eyeshadows in the individual cases!

The first eyeshadow in the top row of my MAC palette is Blanc Type. This is an ivory coloured shadow. It is completely matte, and it is very buttery. On my pale skin, this is the perfect neutral lid colour, but on medium to dark skintones it could be used as a matte highlight.

The second eyeshadow in the top row is Naked Lunch. This is a very pale peachy-pink. This eyeshadow is very shimmery. MAC describes it as having a 'Frost' finish, meaning that it is shimmery, but not glittery.

The third eyeshadow in the top row of my MAC palette is All That Glitters. This is one of my favourite MAC eyeshadows. This is a peachy-pink shade with gold running through it. MAC describes it as having a 'Veluxe Pearl' finish, meaning that it has a metallic, shimmery finish.

The last eyeshadow in the top row is Sable. This eyeshadow is a bronzey-plum colour with gold shimmer. This eyeshadow has a 'Frost' finish, so just like Naked Lunch, it is shimmery, but there are no glitter particles in it.

The first eyeshadow in the bottom row of my MAC palette is Omega. This is a light taupe colour. This eyeshadow is completely matte, so like Blanc Type, there is no glitter or shimmer at all. It is also very buttery.

The second eyeshadow in the bottom row is Satin Taupe. This is a purple-toned dark taupe colour. This eyeshadow has a 'Frost' finish, meaning that like Naked Lunch and Sable, it is quite shimmery, but there is no glitter in this eyeshadow.

The third eyeshadow in the bottom row is Woodwinked. This is a bronzey-gold colour. This eyeshadow has a 'Veluxe Pearl' finish, meaning that like All That Glitters, it looks very metallic and shimmery on the eyelid.

The last eyeshadow in the bottom row of my MAC palette is Quarry. This eyeshadow is a plum-brown colour. This is a matte eyeshadow, so like Omega and Blanc Type, it is very buttery and there is no shimmer in it whatseoever.

One of my favourite looks using the eyeshadows from my MAC palette is using All That Glitters and Sable. I pat All That Glitters all over my eyelid, using my MAC 239 brush. I then blend Sable into the crease using my MAC 217 blending brush, and then finally, I blend everything together once more using my clean MAC 224 brush with no eyeshadow on, to ensure that the eyeshadow is completely blended. Then, I line my lashline with my MAC Teddy eyeliner. I love this eye look because it makes a kind of plumy smokey eye, which makes my green eyes pop.

You can buy all MAC products in Brown Thomas stores, most BT2 stores, on the Brown Thomas website.


July 19, 2015

THE ONLY FIVE MAKEUP BRUSHES YOU NEED


Recently, I was going through my everyday jar of makeup brushes, and I realised that there are so many brushes that I rarely use, and I find myself using the same few brushes everyday. I decided to try and clear out my makeup brush jar and only keep the brushes that I use on a day-to-day basis in it. These are the brushes that made the cut:

This is my favourite brush to use for foundation as it speeds up the process and it really buffs the foundation into the skin, which gives a very natural finish while still giving good coverage. This brush is also great for buffing concealer into the skin.

This is the best brush to use for contouring and highlighting, and it can also be used for bronzer. I love this brush because it is very soft, and the tapered end means that you can apply contour powder and bronzer exactly where you want it, and then you can blend it out using the side of the brush. You can also use the side of the brush to apply highlighter at the tops of your cheekbones.

This specific brush is only available in a set with three other brushes, but you can find ones like it from many makeup brands. This brush is great to use for powder, as it is quite small so you are only applying it where you need it, such as to set concealer and on your T-Zone to prevent shine. This brush is also great for applying blush, as because it is quite small and round, it only applies it in the areas where you want it, as I find that many blush brushes are too big for my face.

This is the best multi-tasking brush for eyes. As well as its main use, which is to blend eyeshadow in the crease of the eye, I find that it is also great at depositing a wash of colour over the eyelid, blending eyeshadow under the eye, and applying cream eyeshadow. This brush is also great at applying and blending concealer, but I would advise that you get a second brush for that purpose.

This brush is the only other brush you need for the eyes. This brush is great at lining the eyes with either powder eyeshadow, gel eyeliner or even cream eyeliner. It is also great at smudging eyeliner on the upper and lower lashlines. This brush is also great at filling in the eyebrows with a powder or cream product, because it is just the right size for the eyebrow, and the way it is angled means that you can draw in each individual hair.

These five brushes together can do pretty much any makeup look you like. There are some days when I might need to use an extra brush, such as a lip brush, but on most days, these are the only brushes I ever need to reach for.